Wow, looks like it's time for the November update already. As promised, today I want to give you a small glimpse into my process of creating background graphics for my adventure games, namely the FCotW series.
Some might say - and I can't really argue with that sentiment - that the graphics are among the weakest aspects of my games. But that doesn't mean that I don't put any effort into them, nope! What you see in FCotW1 and the previews of FcotW2 is the result of many hours of hard work. What I lack in artistic talent I need to compensate by meticulous revisions of each pixel until the graphics are at least passable. No masterpiece, sure, but infinitely better than my original mess that would make your eyes bleed and brain hurt trying to make sense of it.
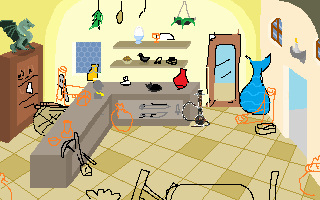
Exhibit A: I give you an already familiar scene from FCotW2.
Some might say - and I can't really argue with that sentiment - that the graphics are among the weakest aspects of my games. But that doesn't mean that I don't put any effort into them, nope! What you see in FCotW1 and the previews of FcotW2 is the result of many hours of hard work. What I lack in artistic talent I need to compensate by meticulous revisions of each pixel until the graphics are at least passable. No masterpiece, sure, but infinitely better than my original mess that would make your eyes bleed and brain hurt trying to make sense of it.
Exhibit A: I give you an already familiar scene from FCotW2.
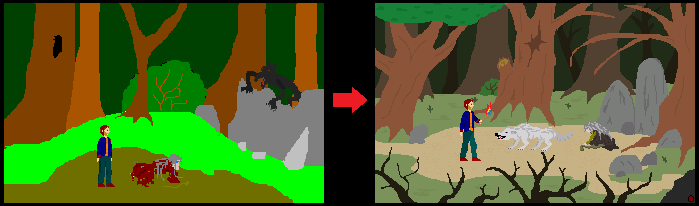
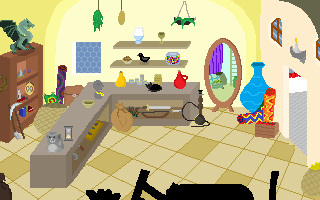
On the right you see my first draft of the scene, created on November 25th 2009. Yes, that's three years ago, and almost two years before FCotW1 was even released. As you can see, the series HAS been in development for quite some time. Anyways, that's an accurate representation of my natural drawing style, and I'm NOT talking about mere concept graphics here. On the right you see the same scene in it's current form, finalized on September 9th, 2011. Obviously I put some work into refining the scene and while the art is still quite basic (what's this thing called "shading" everyone seems to be babbling about?), I think it works well in the game. The background might get some further touch-ups before release, but by and large that's it.
Since we are at it, I will now give you a step by step tutorial of how Wesray does his backgrounds in MS Paint. And yeah I know, Photoshop, GIMP or whatever would be much better suited for a project on the scale of FCotW. But let's just say Paint is my comfort zone and all attempts to use more advanced drawing programs have ended in disaster. So MS Paint it is, and don't even think about trying to convince me otherwise!
The example I'll use in the following is FCotW2's "Shop of Wonders" background that I have already shown in a previous post.
1) Wesray has an idea
In the beginning is the idea. I decide which locations are needed because either the story necessitates them or simply because I think it would be a cool location to have - and yes that's my actual process of reasoning! At that stage, puzzles for the screen tend not to be determined yet, so they will later be fitted to the background or maybe the background is adapted to allow a specific puzzle. More on that in a later post that will deal with puzzle design.
In this case, I wanted to have an indoor shop with a counter and many shelfs which are full of all kinds of bizarre stuff that you can buy - an ideal setting for an adventure game, with lots of possibilities for nice puzzles. And I can't show you a picture of that since, well, at that point it's still in my head. :)
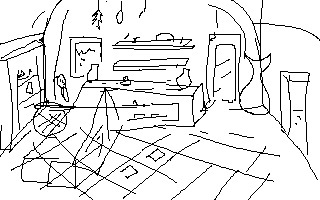
2) Wesray decides on a room layout and draws it
Next step is to determine a layout for the room. That's probably the most critical step for each room I draw, as there are lots of things to consider: Will story relevant scenes take place there and if yes, what are their requirements? Are other characters located in this room? Should the room be scrollable? What size should the player character be in this screen - should he scale and get smaller in the background? Where can you enter and exit the screen? What about perspective issues? What layout would work best in respect of the puzzles that could take place there? Is the layout too similar to other rooms in the game and what could be done to make it more unique? Once I've decided all this stuff I make a simple black and white drawing of the room to give me a first idea how the layout might work and how the characters could fit in sizewise.
For the Shop of Wonders I decided on a simple non-scrollable room with the entrance/exit on the right side of the screen and the counter on the left side. The player character doesn't scale and can be full size. We have at least one other character in this room, the shopkeeper behind the counter. Puzzlewise, we need at least be able to talk to the shopkeeper and look at / buy things. Below you find my first draft of the room.
Since we are at it, I will now give you a step by step tutorial of how Wesray does his backgrounds in MS Paint. And yeah I know, Photoshop, GIMP or whatever would be much better suited for a project on the scale of FCotW. But let's just say Paint is my comfort zone and all attempts to use more advanced drawing programs have ended in disaster. So MS Paint it is, and don't even think about trying to convince me otherwise!
The example I'll use in the following is FCotW2's "Shop of Wonders" background that I have already shown in a previous post.
1) Wesray has an idea
In the beginning is the idea. I decide which locations are needed because either the story necessitates them or simply because I think it would be a cool location to have - and yes that's my actual process of reasoning! At that stage, puzzles for the screen tend not to be determined yet, so they will later be fitted to the background or maybe the background is adapted to allow a specific puzzle. More on that in a later post that will deal with puzzle design.
In this case, I wanted to have an indoor shop with a counter and many shelfs which are full of all kinds of bizarre stuff that you can buy - an ideal setting for an adventure game, with lots of possibilities for nice puzzles. And I can't show you a picture of that since, well, at that point it's still in my head. :)
2) Wesray decides on a room layout and draws it
Next step is to determine a layout for the room. That's probably the most critical step for each room I draw, as there are lots of things to consider: Will story relevant scenes take place there and if yes, what are their requirements? Are other characters located in this room? Should the room be scrollable? What size should the player character be in this screen - should he scale and get smaller in the background? Where can you enter and exit the screen? What about perspective issues? What layout would work best in respect of the puzzles that could take place there? Is the layout too similar to other rooms in the game and what could be done to make it more unique? Once I've decided all this stuff I make a simple black and white drawing of the room to give me a first idea how the layout might work and how the characters could fit in sizewise.
For the Shop of Wonders I decided on a simple non-scrollable room with the entrance/exit on the right side of the screen and the counter on the left side. The player character doesn't scale and can be full size. We have at least one other character in this room, the shopkeeper behind the counter. Puzzlewise, we need at least be able to talk to the shopkeeper and look at / buy things. Below you find my first draft of the room.
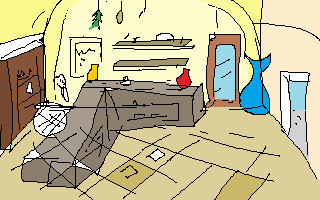
3) Wesray chooses the room's coloring
Once I have decided on the basic layout of the room, my next decision is how to color it. Often I have a preconceived idea what the room should look like, but other times it's just trial and error until I find a color palette that seems to be working for the scene. Again I try to give the room an individual look and feel that distinguishes it from other rooms in the game. After this point, the specific shades of the colors used might still change, but now I have a pretty good idea what the finished room could look like.
Below you find my first attempt of coloring the Shop of Wonders.
4) Wesray cleans up the room
As you have surely noticed, my hand drawn room is full of wobbly lines, so my next step is to go through the whole room and straigthen them (or curve them correctly, you know what I mean!), while simulateneously removing the black outlines, since I decided to work without outlines in part 1 of the series.
In the graphic below I have already worked on the door, the windows, the counter, the shelf and the floor, but not yet on the mirror on the backside of the screen.
5) Wesray adds more details
Once the background has been colored and cleaned up, I often notice that the room is quite empty, even at the resolution of 320x200 I use. In indoor rooms I typically add stuff on the walls and maybe on the floor, while in outdoor scenes rocks, additional plant growth and maybe some small animals are the way to go. Sometimes it's also good to have some stuff in the foreground both for indoor and outdoor scenes. In many cases I do research in the internet to get some ideas for fitting details I could add to a scene, and for some items that I can't get quite right by hand, I even paint over reference pictures.
The Shop of Wonders is a typical example where many details are needed. It should be full of things like statues, trinkets, tools, fabrics, sacks and baskets full off food etc. You can see that I added many details at that point. The water pipe is a reference photo from the internet that still needs to be overpainted in the picture below.
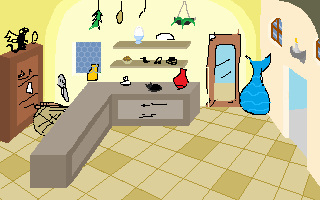
6) Wesray adds the finishing touches
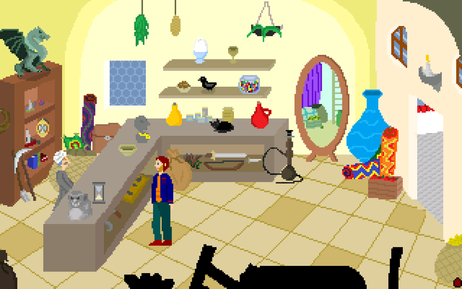
Once the details are done, I usually add some additional improvements like some shadows, additional patterns or grain on big solid surfaces, or some very basic shading to hint at light sources or to accentuate the form of some objects. I also import the screen into the game and test how it works in action, whether some stuff needs to be rearranged and so on. And of course there are animations and characters yet to add to the background plus further changes made for puzzle implementation and finetuning, i.e. some background item might actually become a takeable object.
Below you find the final version of the Shop of Wonders, how it currently looks in the game. I worked on the "Shop of Wonders"-background from April 8th 2012 to April 14th 2012, almost a week. So with 70+ screens in the game you can imagine how it might take me a while to get all the backgrounds done. ;)
Well, that's that. I guess what I wanted to demonstrate with this example is, everyone can draw. I put off creating an adventure game for the longest time because I was afraid of the art hurdle, but in the end I just started doing it anyway. It was learning by doing, and I don't regret it one bit. Sure, the result isn't high art (harhar) and still scares off some potential players, but all things considered I think it works well enough and even has a certain charm.
Anyhow, if you want to learn drawing REALLY GOOD backgrounds for an adventure game, I'm the wrong guy to listen to, there are tons of experts out there who do a much better job then I do, both at drawing and in explaining their process. There you'll also get more formal tutorials including topics like the correct use of perspective and the importance of shading, techniques that I frankly suck at and therefore either ignore or just try to use intuitively in my backgrounds. Which would look a hundred times better if I followed the appropriate methods, but then again I've decided on a style in FCotW1 and plan to stick with it for the rest of the series.
So, that's it for my November arts tutorial. In my December post I will give you a major update about the status quo of FcotW2, rave a bit about how happy I am with some of the decisions I made recently and introduce one of the new characters in FCotW2. Until then, have a happy November, and stay tuned!

 RSS Feed